• Skip to primary navigation
  • Skip to main content
  • Skip to footer

Let's Eat Smart

  • All Recipes
  • Breakfast
  • Lunch
  • Dinner
  • Dessert
  • Tips
  • About
  • Navigation Menu: Social Icons

    • Facebook
    • Instagram
You are here: Home / Dessert / Mini Vegan Biscoff Cheesecakes

Mini Vegan Biscoff Cheesecakes

This recipe for no-bake mini Biscoff cheesecakes is honestly THE BEST cheesecake recipe ever. And that’s a big statement coming from me as I’ve tried a lot of cheesecakes in my life!

Jump to Recipe Print Recipe

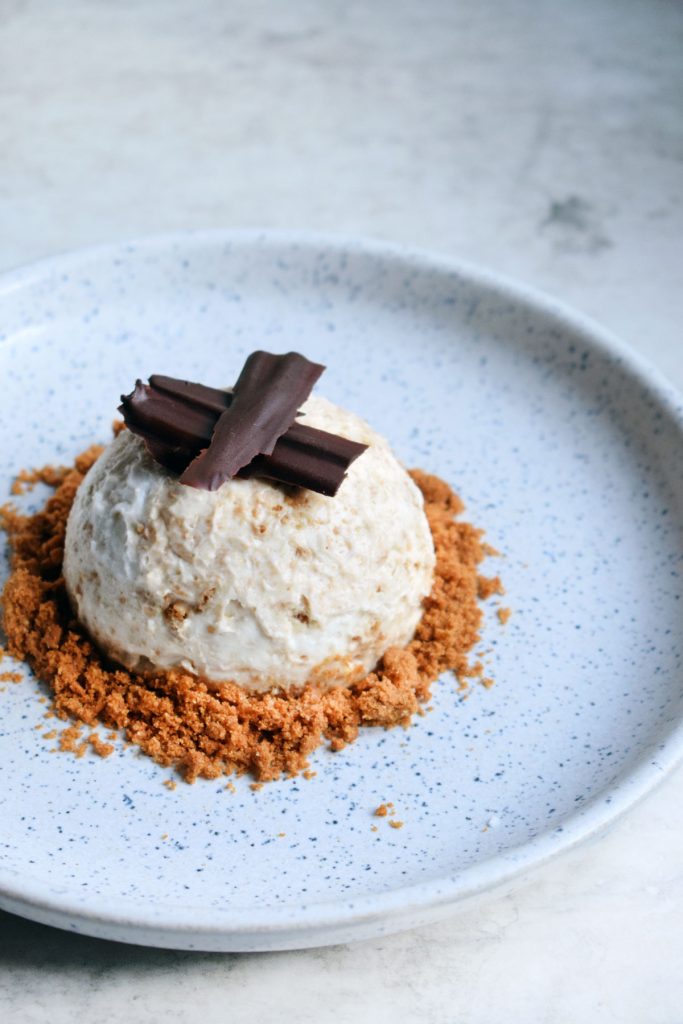
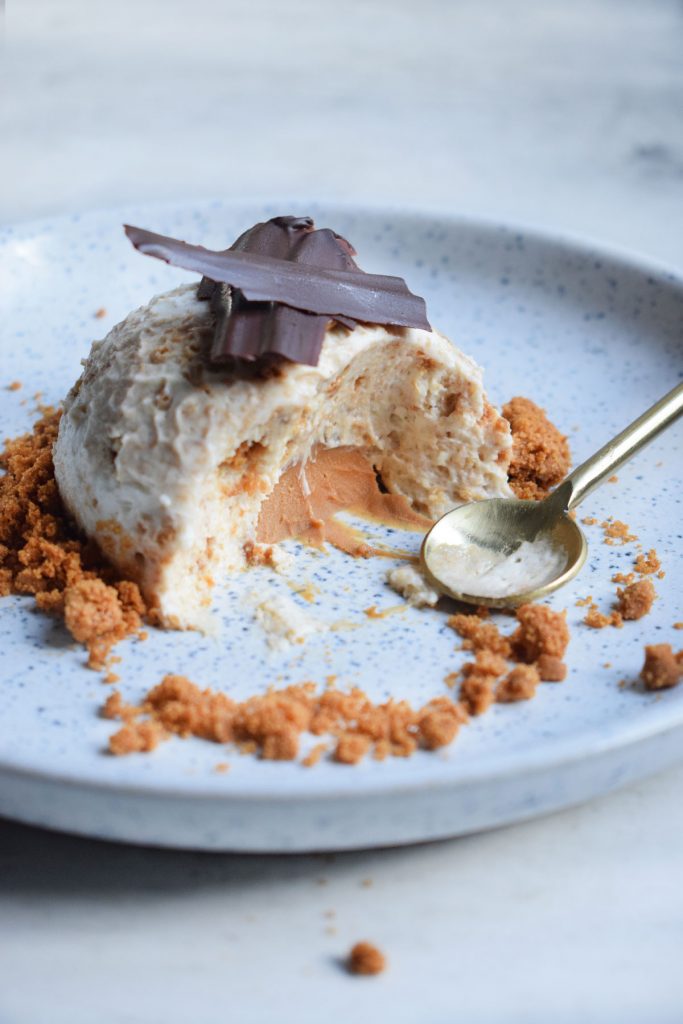
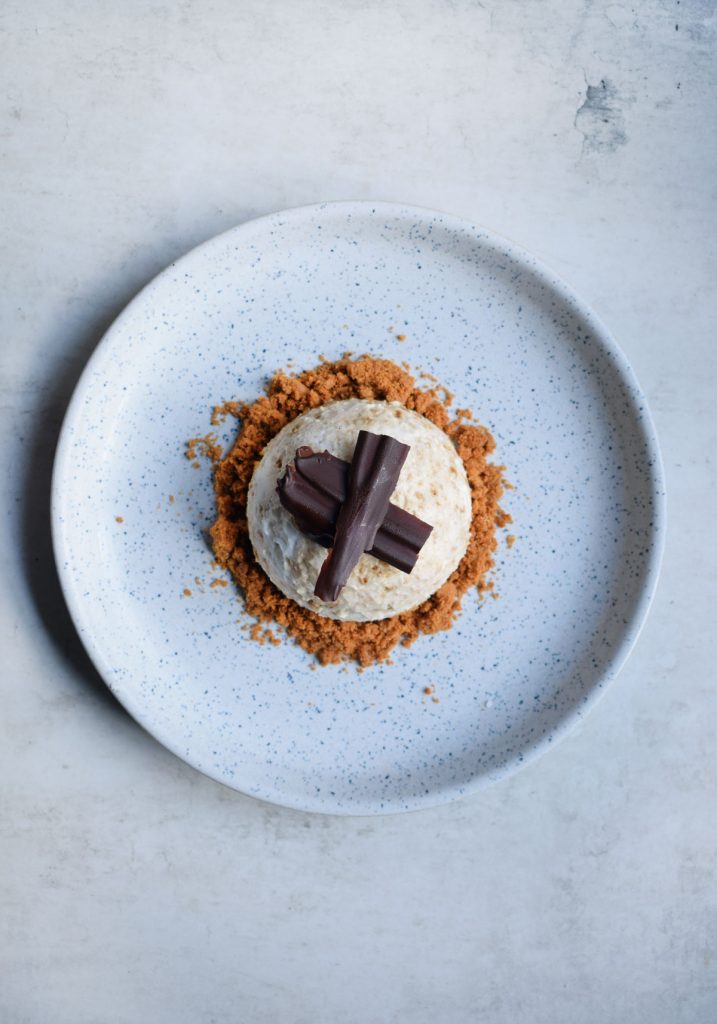
My Biscoff cheesecake is made with crushed biscuits, whipped up soya cream and vegan cream cheese which makes it super airy and gives it a mousse-like texture. Inside the creamy cheesecake dome, there is a smooth Biscoff heart, whilst crushed caramelised biscuits on the outside add extra crunch and flavour to this delicious, easy-to-make dessert.

To make this dessert you will need some sort of dome mould – you can use metal or silicone, it’s up to you. But don’t worry – if you can’t get your hands on a dome mould, ramekins or a small metal bowls will work just fine too. Alternatively, you can make and serve these in a glass or other dish – be creative!

Guys – it’s cheesecake time! And not just any cheesecake – vegan BISCOFF cheesecake. Let’s do this!

Mini Vegan Biscoff Cheesecakes

Print Recipe
Course Dessert
Keyword Biscoff, cheesecake, vegan
Servings 2
Author Let’s Eat Smart

Ingredients

For the cheesecake

  • 1/3 cup soya single cream alternative
  • 120 g vegan cream cheese
  • 1 tsp sugar
  • 5 caramelised biscuits (crushed)

For the middle

  • 1 tbsp smooth biscoff spread

For the crumble

  • 4 caramelised biscuits (crushed)

For decoration

  • 20 g dark chocolate

Instructions

  • To make the soft biscoff centre, simply place one tablespoon of smooth biscoff spread (or any other caramelised biscuit spread) into a microwaveable dish. Microwave for 10-15 seconds until melted. Pour the melted spread into silicone dome moulds or ice cube trays. Alternatively, spoon the spread onto a little plate and place in the freezer to firm up for around 10 minutes. This will make the spread more manoeuvrable and you will be able to roll it into two small balls using your hands. Once rolled, keep in the freezer until needed. 

To make the cheesecake

  • Place the single soya cream into a bowl. Using an electric whisk, whisk the cream until fluffy, for around 5 minutes. Slowly add in the sugar and cream cheese and continue whisking until smooth. 
  • Stir in the crushed biscoff biscuits then divide the mixture between two metal or silicone dessert domes or ramekins. Top each one with the frozen biscoff spread dome/ball, pushing it in to ensure the top is nice and even (it will be flipped onto a plate so use a palette knife to smooth out the top if needed). 
  • Place the domes/ramekins into the freezer for at least 3 hours. 
  • Take the cheesecakes out of the freezer and tip upside down and onto a plate. If the cheesecake is stuck to the mould and doesn't want to come off, use a kitchen blowtorch or a lighter to heat the moulds to soften the cheesecake so that it comes out easily. Leave the cheesecakes for at least an hour to defrost.
  • Scatter the remaining crushed biscuits around the dessert.

For the chocolate shard

  • Melt the chocolate. Line a plate with baking parchment then using a spoon, spread the melted chocolate onto the paper. Place in the freezer for 15 minutes to set. Once set, gently peel the chocolate off the parchment paper, break into a couple of shards and place on top of each cheesecake.

Share this recipe with your friends!

  • Twitter
  • Facebook
  • Pinterest
  • LinkedIn
  • Tumblr
Previous Post: « Low Carb Bounty Bars (Vegan, GF, Keto)
Next Post: Vegan Chocolate Tiramisu Puds »

Footer

Take an insta peek

Vegan Herby Green Butter Beans 🌿🫘✨ Creamy, Vegan Herby Green Butter Beans 🌿🫘✨
Creamy, herby, zesty and packed with flavour!  Sauté leek, garlic & cumin, then simmer butter beans in their liquid with a stock cube. Stir in fresh dill, coriander, spinach & a spoon of vegan mayo. Finish with lemon juice, chilli flakes & a drizzle of olive oil. Pure plant-based comfort in a bowl 💚  🌱FIND THE FULL RECIPE & INSTRUCTIONS ON MY BLOG 🌱  #veganrecipes #butterbeans #plantbased #healthyvegan #vegancomfortfood #vegandinner #veganfoodshare #whatveganseat #simplevegan #veganlife #meatlessmeals #oilfreevegan #wholefoodplantbased #dairyfree #veganeats #crueltyfreefood #veganflavours #greenmeals #veganprotein #legumesofinstagram #easyveganmeals #seasonalveg #veganinspo #wfpb #onepanmeals
Homemade peanut butter in 3 steps 🥜✨😍 Roa Homemade peanut butter in 3 steps 🥜✨😍  Roast 200g peanuts at 180°C for 20–25 min, cool, then blend (add 3–4 dates if you like it sweet). At first, the peanuts will turn into a crumbly, sandy mix — but keep going! Soon it’ll be creamy and dreamy. Add salt to taste.  Store in a jar & enjoy for up to 2 weeks (if it lasts that long 😉).  #homemade #peanutbutter #easyrecipes #veganfood #vegansnack #plantbased #veganrecipes #whatveganseat #crueltyfree #dairyfree #healthyeating #veganprotein #veganlife #wholefoods #veganfoodshare #veganlifestyle #healthyvegan #simplevegan #veganeats #plantbasedrecipes #veganpantry #oilfreevegan #cleanvegan #veganinspo #nutbutterlove #vegancomfortfood
Vegan SNICKERS brownies!!! 💥 * 110 g melted v Vegan SNICKERS brownies!!! 💥  * 110 g melted vegan butter
* 140 g caster sugar
* 1/4 tsp salt
* 1 tsp baking powder
* 1 tsp vanilla extract
* 45 g cocoa powder
* 115 g plain flour
* 1/4 cup plant milk
* 80 g melted, good quality dark chocolate
* 2 @loveraw peanut caramel bars (gifted)
* 1/3 cup salted roasted peanuts
* 2 tbsp peanut butter  Instructions: 
* Preheat the oven to 160°C. Grease a 6-inch loaf tin and line with baking paper and set aside.

* In a bowl, mix the caster sugar, melted vegan spread, vanilla extract, cocoa powder, salt and baking powder.

* Once combined, fold in the flour, then add in the milk and melted dark chocolate and mix until combined.

* Chop up the peanut caramel bars into smaller, bite-size chunks.

* Add the chopped up bars and peanuts into the batter. Stir to incorporate.

* Transfer the mixture into the tin, roughly dollop the peanut butter on top, level the top with a spatula and bake for around 20-24 minutes.

* Cool completely before cutting into squares. These brownies taste delicious on the day they're made and even better the following day!  #peanutcaramelbar #loveraw #brownie #veganbaking #vegandessert #vegan #dessertporn #baking #foodblog #foodie #recipe #veganrecipe #veganrecipes #veganlife #vegansofig #brownielovers #brownierecipe #vegetarian #dairyfree #milkfree
AD gifted | Indulge yourself with this delicious v AD gifted | Indulge yourself with this delicious vegan ferrero rocher style cheesecake made with Love Raw hazelnut chocolate balls! They taste JUST like the OG choc but contain no palm oil, no artificials and are completely plant based. Recipe for this cheesecake landing on the blog at 8pm ✨  #cantbelieveitsvegan #vegan #veganuary #plantbased #dessert #vegancheesecake #loveraw #chocolate #yum #veganfoodie #veganlifestyle #vegancommunity #veganrecipes #veganism #veganeats #veganfoodporn #veganfoodshare #veganbaking #veganchef #veganlife #veganfood #vegandessert #veganyum #veganchocolate #veganhazelnut #vegancake #veganbake #veganbaker #veganinspo #veganfoodie #veganlover #vegancommunity
AD | Chewy, gooey, caramelised biscuit cookies 🍪  With crunchy caramelised biscuit wafer pieces from @loveraw  Makes 8
Ingredients
* 120 g golden caster sugar
* 50 g dark chocolate chunks
* 2 @loveraw caramelised biscuit wafer bars
* 1/8 tsp salt
* 200 g plain flour
* 1/2 tsp baking soda
* 60 g butter, melted
* 50 g caramelised biscuit spread
* 70 g golden syrup
* 3 tbsp water
Instructions
* Preheat the oven to 180C | gas mark 4. Line a baking sheet with baking paper and set aside.

* In a large bowl, combine the golden caster sugar, chocolate chunks and salt. Sieve in the flour and soda.

* In a separate bowl, combine the biscuit spread, butter and golden syrup. Once combined, add it to the flour mixture. Mix using a wooden spoon and bring the dough together using your hands.

* Divide the dough into 8 golf sized balls, flatten slightly and place on the baking tray. Roughly chop the wafer bars and gently push in a couple of pieces into each cookie. 

* Bake in the middle of the oven for 8-10 minutes. The edges of the cookies should feel firm but the centre will be still quite soft. Leave to cool for 15 minutes.  #biscoff #caramelisedbiscuit #cookies #chewycookies #chocoholic #dessertporn #vegandessert #vegetarianrecipe #recipe #foodporn #vegan #veganfoodshare #veganfoodporn #veganfood #veganrecipes #foodinspo #foodblog #foodie #foodshare #veganmealprep #veganism #foodinsta #fitspiration #cantbelieveitsvegan #cleaneating #diet #mealprepinspo #plantbaseddiet #bvsbackdrops
Crispy salt and pepper tofu with a super crispy sk Crispy salt and pepper tofu with a super crispy skin and a soft middle 🤩 4 simple ingredients, 20 minutes to make. My recipe for this bad boy will be available on the blog this evening!  Ad - Salt & pepper mills are @coleandmasonofficial (gifted with no obligation to post). How absolutely gorgeous are they?! My new favourite kitchen accessory 😍  #tofu #crispytofu #tofurecipes #tofulover #tofurecipe #vegan #veganrecipes #veganfood #veganuk #veganlife #veganism #coleandmason #saltandpepper #bvsbackdrops #foodphotography #foodstylist #foodporn #foodie #foodblogger #foodblogfeed #discoverunder5k #vegetarian #friendsnotfood #foodstagram #foodpicoftheday
Throwback to these vegan mille-feuilles I made las Throwback to these vegan mille-feuilles I made last year 😍 Find the recipe for these beauties on the blog 🤩 #millefeuille #millefeuilles #vegancake #vegandessert #dessertporn #vegetarian #vegetarianrecipe #recipe #foodporn #vegan #veganfoodshare #veganfoodporn #veganfood #veganrecipes #foodinspo #foodblog #foodie #foodshare #healthyfood #healthyeating #veganmealprep #veganism #foodinsta #fitspiration #czystamicha #cleaneating #diet #mealprepinspo #plantbaseddiet #veganvibes
This avocado, cannelloni & lime dip takes only 5 m This avocado, cannelloni & lime dip takes only 5 minutes to make and oh my goodness it is GOOD! Perfect for wraps or for dipping crackers or crudités!  You’ll need:
* 1 avocado 
* 1 can cannelloni beans
* 1/2 lime (juice only)
* 1 tsp tahini
* 1 tbsp extra virgin olive oil
* 1 small garlic clove
* Chilli flakes, salt, pepper and turmeric to taste  Instructions 
Scoop the avocado flesh into a blender or food processor. Add the beans, like juice, tahini, oil and garlic and blitz until smooth.  Season to taste!  #recipe #foodporn #vegan #veganfoodshare #veganfoodporn #veganfood #veganrecipes #foodblog #foodie #friendsnotfood #vegangirl #crueltyfree #vegansofinstagram #poweredbyplants #vegangirl #glutenfree #foodphotography #plantbased #foodstyling #homemade #veganmealideas #dip #bvsbackdrops #plantbasedfood #plantbasedrecipes #plantbaseddiet #veganuk #easyrecipe
Follow on Instagram

Recipes

  • Breakfast
  • Lunch
  • Dinner
  • Dessert
  • Gluten-Free

Quick Links

  • About
  • Affiliate Discretion
  • Privacy and Cookie Policy
Privacy & Cookies: This site uses cookies. By continuing to use this website, you agree to their use.
To find out more, including how to control cookies, see here: Cookie Policy

Copyright © 2025 Let's Eat Smart