• Skip to primary navigation
  • Skip to main content
  • Skip to primary sidebar
  • Skip to footer

Let's Eat Smart

  • All Recipes
  • About
    • The girl behind Let’s Eat Smart
    • Privacy Policy
    • Affiliate Discretion
  • Breakfast
  • Lunch
  • Dinner
  • Dessert
  • Tips
  • Navigation Menu: Social Icons

    • Facebook
    • Instagram
    • Twitter
You are here: Home / Dinner / Cauliflower wings

Cauliflower wings

26th August 2018 by letseatsmart Leave a Comment

I’m a little late to the cauliflower wing bandwagon, I know. Cauliflower wings have been a thing on the internet for a while, but I only recently gave them a try. On a recent trip to (my now absolute favourite) vegan friendly pub in Worcester, Firefly, I tried their spicy cauliflower vegan wings and totally fell in love. One bite in and I immediately knew I had to recreate them for the blog.

I’m not sure what spices were used in their version, but I used pretty much anything spicy I could find in my cupboard.

This recipe is easy, requiring just  10 ingredients and very simple methods to prepare!

The spicy coating utilises the Encona Limited Edition Carolina Reaper Chilli Sauce (if you want them to be less spicy, use a milder sauce), soy sauce for saltiness and depth of flavour, a few spices and lastly, a drop of maple syrup for a bit of sweetness & balance.

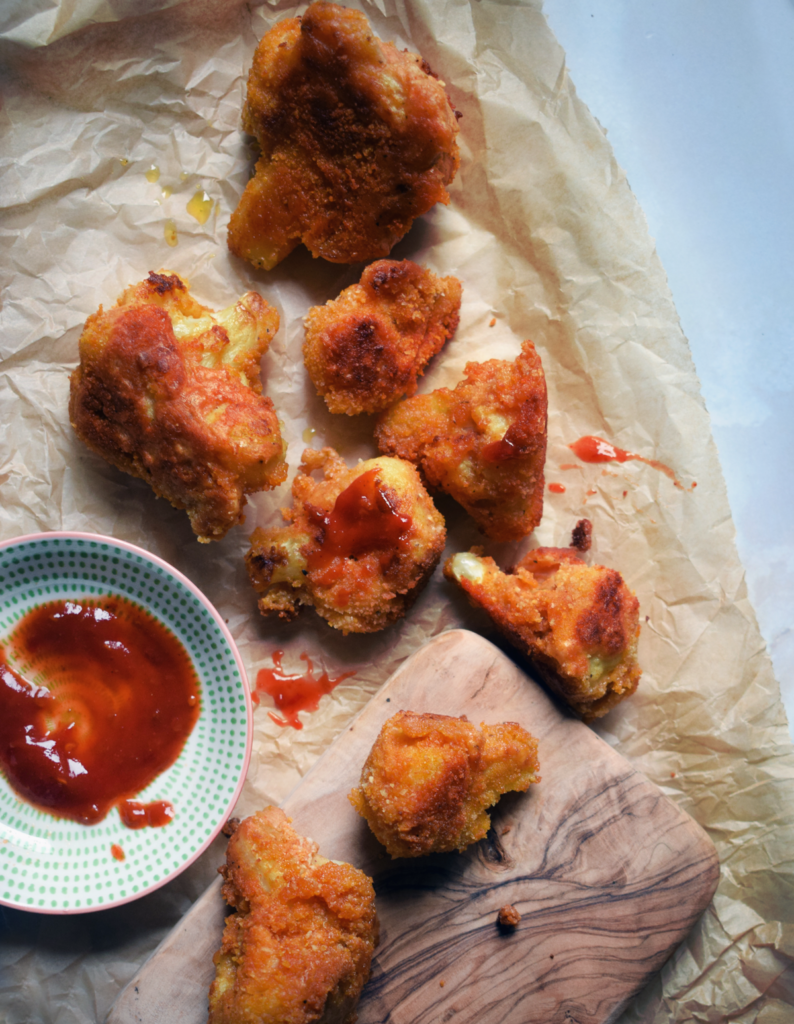
Soft and tender on the inside and crispy on the outside, these spicy cauliflower wings are gluten-free, vegan and literally to die for. If you want to make them a little healthier, you could bake them in the oven for around 25 minutes at 200C they are equally delicious, just less crispy!

Print Recipe

Cauliflower wings

Soft and tender on the inside and crispy on the outside, these delicious spicy vegan cauliflower ‘wings’ are incredibly easy to make!
Prep Time10 mins
Cook Time15 mins
Total Time25 mins
Course: Dinner, Lunch
Servings: 4

Ingredients

  • 1 cauliflower
  • 3/4 cup soya milk
  • 1 cup plain flour
  • 1 tsp garlic powder
  • 1 tsp cumin powder
  • 1 tsp paprika
  • 5-6 tbsp hot chilli sauce
  • 1 tsp soy sauce
  • 1 tsp maple syrup
  • oil for frying

Optional

  • 1 cup breadcrumbs

Instructions

  • Cut the cauliflower into bite-sized pieces.
  • Mix the milk, flour, spices and hot chilli sauce in a medium mixing bowl until the batter is thick and is able to coat the cauliflower without dripping. If the mixture is too thick, add a bit more milk or water. If it’s too runny, add a teaspoon of flour at a time until desired consistency.
  • For added texture and crispiness, coat the florets in golden breadcrumbs. 
  • Heat 2 tablespoons of vegetable oil in a frying pan. Dip the cauliflower pieces into the batter one by one. Shake off excess batter before placing cauliflower in the pan. Fry until golden brown, flipping the florets over to get all sides golden brown and crispy.

Share this recipe with your friends!

  • Twitter
  • Facebook
  • Pinterest
  • LinkedIn
  • Tumblr

Filed Under: Dinner, Lunch

Previous Post: « Creamy pesto pasta
Next Post: Vegan sources of protein »

Reader Interactions

Leave a Reply Cancel reply

Your email address will not be published. Required fields are marked *

Recipe Rating


Primary Sidebar

Welcome!

Welcome to Let's Eat Smart, a vegan food blog where everyone from novice cooks to professional chefs can find sweet and savoury recipes to inspire and treasure. Here you’ll find my favourite vegan recipes. I love making homemade bread, curries, cakes and everything in between! My dog, Peanut, catches the crumbs.

Foodies100 Index of UK Food Blogs
Foodies100

Recent Posts

  • Baked Vegan Cheesecake (NO cream cheese!)
  • Vegan Butternut Squash Mac n’ Cheeze
  • Turmeric, Ginger and Garlic Vegan Flatbreads (yeast-free)
  • Home-made Vegan Berry Yoghurt with Buttery Almond Crumble
  • Easy ‘cheat’ vegan yule log

Categories

  • Breakfast
  • Dessert
  • Dinner
  • Gluten-Free
  • Lunch
  • Smoothie Bowls
  • Tips
  • Uncategorised

Top recipes

Baked Vegan Cheesecake (NO cream cheese!)

Vegan Butternut Squash Mac n’ Cheeze

Turmeric, Ginger and Garlic Vegan Flatbreads (yeast-free)

Home-made Vegan Berry Yoghurt with Buttery Almond Crumble

Footer

Take an insta peek

AD (gifted) | Vegan Potato & Cheese Stuffed Pierog AD (gifted) | Vegan Potato & Cheese Stuffed Pierogi 🥟  Makes 42 
For the dough:
* 300g plain flour
* 1/4 tsp salt
* 200ml boiling water
* 30g vegan margarine  For the filling:
* 320g potatoes
* 220g vegan cream cheese (I used @sheeseuk *gifted*)
* 1 tsp black pepper
* 1/2 tsp salt
* 1 small onion, finely chopped
* 1 tbsp vegan margarine or olive oil for frying  Peel, chop and boil the potatoes until soft and fluffy. Once cooked, drain and set aside to cool completely.  Meanwhile, heat a little vegan margarine in a frying pan. Cook the onion over a low heat for 10 mins or until completely soft and slightly caramelised. Set aside.  Once the potatoes are cool, add in the cream cheese, caramelised onions, pepper and salt. Using a potato masher, mash until well combined. Aadd more salt or pepper if necessary.  To make the dough, sift the flour and salt into a large mixing bowl. Dissolve the vegan margarine in 200ml of boiling water, then pour over the flour. Stir using a wooden spoon to form a dough. Tip onto a floured surface and knead for 5-10 minutes until smooth.  Sprinkle your work surface with flour and roll out the dough until it is approx. 3mm thick. Using an inverted glass tumbler, cut out 6cm circles of dough.  To fill the pierogi, place a circle of dough in the palm of your hand and place a teaspoon of the filling in the middle. Fold the dough over to enclose the filling then, using your thumb and index finger, pinch along the edge to seal.  Place the pierogi onto a floured surface and cover with a tea towel to prevent them from drying while you make the rest.  To cook, bring a large pan of water with a pinch of salt to the boil. Carefully drop the pierogi one at a time into the water (depending on the size of your pot you should be able to cook around 8-10 at a time). Keeping the water at a gentle boil, cook the pierogi for 6 mins.  Using a slotted spoon, lift the pierogi out of the water. You can serve them as they are with a drizzle of melted vegan butter and caramelised onions or gently fry them with a little vegetable oil or vegan butter alternative until golden and slightly crispy.
Vegan 3 ingredient Chocolate Nests 🐣🐰 Make Vegan 3 ingredient Chocolate Nests 🐣🐰  Makes 8:
• 150g vegan chocolate (I used @nomochocolate)
• 2 shredded wheat biscuits
• 16 vegan mini eggs (I used @doisyanddam) 🐣 Melt the chocolate. 🐣 Gently break up the shredded wheat biscuits using your hands and into a bowl. 🐣 Pour the milk chocolate over the shredded wheat and mix to combine.
🐣 Spoon the mixture into 8 cupcake cases and top with a couple mini chocolate eggs.
🐣 Place in the fridge for around 30 minutes or until set.  #easternests #easterbaking #easter #chocolatenests #veganchocolate #vegetarian #vegetarianrecipe #recipe #foodporn #vegan #veganfoodshare #veganfoodporn #veganfood #veganrecipes #foodinspo #foodblog #foodie #foodshare #healthyfood #healthyeating #veganmealprep #veganism #foodinsta #fitspiration #czystamicha #cleaneating #diet #mealprepinspo #plantbaseddiet #veganvibes
Blueberry and lemon hot cross buns 🐣🐰 if you Blueberry and lemon hot cross buns 🐣🐰 if you’re like me and you HATE raisins, then this recipe is for you! You can find the recipe for these on my blog 👍
Chocolate orange hot cross buns 😍 this has got Chocolate orange hot cross buns 😍 this has got to be my fav flavour combo! 🍊🍫 what’s yours? 😋 PS. Recipe for this beauties in on the blog 👩‍💻 #easterbaking #easterrecipes #easter #baking #homebaking #veganbaking #hotcrossbuns #veganrecipe #veganfood #veganrecipes #veganuk #friendsnotfood #chocolateorange #chocolatelover #chocolate #foodblogger #foodstyling #foodie #vegangirl #crueltyfree #vegansofinstagram  #poweredbyplants #vegangirl #foodphotography #plantbased #foodporn #veganfoodshare
I’ve been neglecting my Instagram account lately I’ve been neglecting my Instagram account lately and there is a few reasons for that! BUT my chewy chocolate cookies seem to be super popular on the blog this month so I’m assuming you’re all baking! 👩🏻‍🍳🧑🏾‍🍳👨🏿‍🍳 Thanks for sticking by, I’ll be back with more recipes SOON! 💚  #cookies #chewycookies #chocoholic #dessertporn #vegandessert #vegetarian #vegetarianrecipe #recipe #foodporn #vegan #veganfoodshare #veganfoodporn #veganfood #veganrecipes #foodinspo #foodblog #foodie #foodshare #healthyfood #healthyeating #veganmealprep #veganism #foodinsta #fitspiration #czystamicha #cleaneating #diet #mealprepinspo #plantbaseddiet #veganvibes
AD | Treat your mama to some delicious jams and pr AD | Treat your mama to some delicious jams and preserves this mother’s day and whip up a bunch of edible cherry jam filled buns! Because nothing says “I love you” like an edible ‘rose’ bouquet! 🌹  I’ve partnered up with @rosebudpreserves to give you a whooping 15% off with the code GIFTA15 💴  Cherry rose buns: 
Ingredients
For the dough
* 250g plain flour
* 20g golden caster sugar
* pinch of salt
* 125ml plant milk
* 1 tsp yeast
* 35g vegan margarine, melted
For the filling
* 100g cherry jam  Instructions
* Sieve the flour into a large mixing bowl. Add the sugar and salt and mix.
* Heat the milk until lukewarm. Add the yeast and stir until dissolved.
* Add the yeast mixture into the flour together with melted margarine. Using a wooden spoon, mix to form a dough, then knead for about 5 minutes. The dough will be quite sticky. You can add a little flour to help, but try not to add more than 1/4 cup – stickier dough means lighter, airier buns.
* Place the dough back in the bowl, cover with cling film and leave in a warm place for about an hour or until doubled in size.
* Once risen, roll the dough into a large rectangular shape. Spread the jam then, starting from the long side, tightly roll the dough into a large tube. 
* Use a sharp knife to cut scrolls out of the dough. 
* Arrange on a greased baking tray, leaving a little space in between each one. 
* Set aside to rise whilst you preheat the oven to 180°C.
* When the oven is hot, bake for 15-20 minutes or until slightly golden brown. Set aside to cool.
If you were a pancake, which pancake would you be? If you were a pancake, which pancake would you be? 🥞  I think I would be a classic crepe. Thin, sweet and delicate 🤣🤣  Easy Vegan Crepes (4 ingredients!)
Servings: 10 crepes
Ingredients
* 1 3/4 cup plain flour
* 1 1/2 cup plant milk
* 1 tsp maple syrup
* 2 tbsp melted coconut oil
For frying
* coconut oil
Instructions
* In a bowl, combine all of the ingredients until there are no lumps. It’s easier to pop it all in a blender and blend for 30-60 seconds, but a hand whisk is fine.
* Heat a lightly oiled pan over medium heat and pour the batter onto the pan. Tip and rotate the pan to spread the batter as thinly as possible.
* Fry for 1-2 minutes before flipping.
* Serve with your favourite toppings, I went with whipped up vegan double cream, chocolate sauce and blueberries.

#pancakeday #veganpancakes #pancakerecipe #crepes #crêpe #pancake #pancakesforbreakfast #pancakestack #vegan #veganrecipe
AD Thicccc and chewy oat and berry cookie anyone? AD  Thicccc and chewy oat and berry cookie anyone? 😉 SAVE this post for later! 🍪  Makes 5 thick cookies  * 40g vegan margarine
* 60g coconut sugar
* 1 tbsp golden syrup
* 1 tsp vanilla extract
* 3/4 cup plain oats
* 1/3 cup plain flour
* 1/2 tsp baking soda
* pinch of salt
* 1 tsp pumpkin pie spice (alternatively use a mix of cinnamon, nutmeg and ginger)
* 1 tbsp plant milk
* 55g fruit and nut mix of choice (I used @rollasnax berry & coconut)  Preheat the oven to 180C. Line a baking tray with baking parchment and set aside.  Add the butter and sugar into a bowl and using a wooden spatula mix to combine. Stir int he golden syrup and vanilla extract.  Add the oats, flour, soda, salt, pumpkin spice and milk and mix to combine. Stir in the fruit and nut mix.  Roll the dough into 5 balls and place onto the baking parchment lined tray. Bake in the middle of the oven for 15 minutes or until golden. The cookies will be soft when you take them out of the oven but will firm up once cool.

Copyright © 2021 Let's Eat Smart